
How to Warm Up Your Gmail Account for Mail Merge
Email providers are wary of senders they haven’t seen before. If a new account sends 400 emails on its first day, it looks like a spammer, and many of those emails can land in spam. Warm-up means sending a few wanted emails at a time, then increasing the volume as you see how delivery goes.
There’s no magic number of days that earns you a place in the inbox. A steady pace helps, but your list, your domain setup, and whether people want your emails matter too.
Start smaller when:
- the Gmail or Google Workspace account is new
- your domain is new, or hasn’t sent much email before
- you’re emailing a list you haven’t written to in months
- you’re planning to send much more than you usually do
What gets warmed up
Section titled “What gets warmed up”Mail Merge sends messages through Gmail, so Google manages the sending servers. You don’t have a dedicated IP address to warm up yourself. Focus on your sending history and, for Google Workspace, the reputation of your domain, like company.com.
If you send from a gmail.com address, Google handles the domain setup. You still need to build a history of sending emails people want. For a custom domain, everyone who sends from it can affect its reputation.
Before you start
Section titled “Before you start”- Choose people who asked to hear from you. Start with recent subscribers or customers who requested these messages. Knowing someone’s address, or having sold to them once, doesn’t mean they want your emails.
- Remove known bad addresses. Leave out previous bounces and anyone who unsubscribed. Don’t use a bought or scraped list.
- Check your domain setup. For Google Workspace, verify SPF, DKIM and DMARC with Gmail’s Show original. The domain setup checklist shows you where to look.
- Give people a way to leave. Add an unsubscribe link to newsletters and marketing emails.
- Check your available quota. Go to Extensions > Mail Merge with Attachments > Show Email Quota. Leave room for other sending from the same account.
Send yourself a test email before the first batch. Check the sender name, links and merge fields, so your first readers get the email you meant to send.
A warm-up plan
Section titled “A warm-up plan”Here’s a typical pace for a new account. It’s a starting point, not a Google limit or a promise of inbox delivery.
| Stage | Emails a day | When to move on |
|---|---|---|
| First few days | 10 to 20, to your most recent contacts | After a few batches without delivery problems. |
| Next week or two | Grow by about a quarter at a time | Hold for a few days after each increase. |
| Following weeks | Keep growing toward the volume you need | Hold or reduce volume if problems appear. |
| At your usual volume | Stay at a steady pace | Stop increasing. You don’t need to reach your quota. |
For example, if 20 emails a day are going well, try 25 rather than jumping straight to 100. Even a warmed-up account looks odd if it jumps from 50 a day to 1,000 overnight.
Google recommends starting with engaged recipients, sending at a consistent rate, and avoiding sudden jumps. It also recommends reducing volume when messages bounce or are deferred.
Your Mail Merge quota is an upper sending limit, not a warm-up goal. CC and BCC addresses count toward it too, and new Workspace accounts have a lower quota during their trial.
Send a small batch every hour
Section titled “Send a small batch every hour”Automatic scheduling needs the premium Run in the background feature. On the free plan, hide or filter all rows except today’s batch, leave their Scheduled Date cells empty, and click Send Emails yourself each day.
With the premium plan, give each row a time and Mail Merge sends a few emails every hour on its own:
-
Go to the File menu, choose Settings and check the spreadsheet’s Time zone and Locale. Mail Merge uses that time zone, and Sheets reads dates in that locale.
-
Type a future start date and time in an empty cell outside your data, such as E1 in the screenshot. The example uses
11/20/2026 8:00in a US-locale sheet. Use the date format for your locale. -
In the Scheduled Date column, put this formula in row 2. The
/2gives each pair of rows the same time, one hour after the previous pair. For the first day, fill it down 20 rows, so 20 emails go out over 10 hours.=$E$1+INT((ROW()-2)/2)/24OutputNov 20 8:00 AM for rows 2-3, Nov 20 9:00 AM for rows 4-5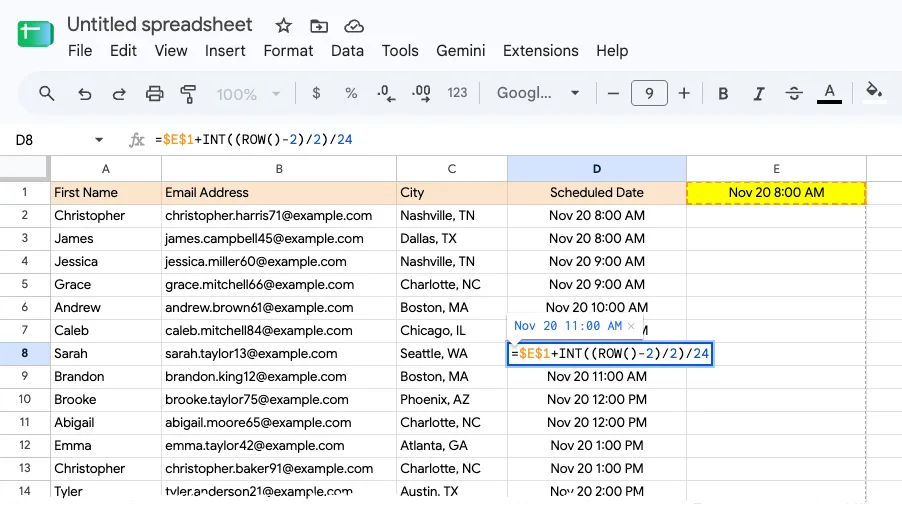
Two rows share each hourly send time. -
Select the Scheduled Date column and go to Format > Number > Date time. Check the first and last dates. Then copy the dates and paste them back as values with Ctrl+Shift+V (Cmd+Shift+V on Mac), so they don’t change if you sort or delete rows.
-
Go to Save & Run, check Run in the background, and click Send Emails.
The formula doesn’t stop at night or on weekends, so fill it down only as far as the batch you want to send. Send times are approximate: the background run checks once an hour, and an email may go out up to half an hour before or after its time. See scheduling emails for more.
Use the warm-up planner
Section titled “Use the warm-up planner”For a daytime schedule with a daily cap, open the email warm-up planner and make a copy in your Google Drive.
Its Schedule tab has settings for your start date, daily cap, emails per batch, and first and last sending hours, and it calculates times for 100 emails. The example sends 20 emails a day, two an hour from 9 am to 6 pm, including weekends. The Results tab is a place to record each day’s sends, bounces, replies and next step.
Set a future start date and check File > Settings > Time zone in the planner. Copy only as many dates as you need from its Scheduled Date column and paste them as values into your campaign’s Scheduled Date column. The planner doesn’t send emails or increase your volume on its own.
Check delivery before sending more
Section titled “Check delivery before sending more”After each batch, open Extensions > Mail Merge with Attachments > Campaign Reports > View Bounced Emails. The bounce report works with or without tracking. Read the reason for each bounce: a nonexistent address needs a different fix from a temporary sending restriction.
| What you see | What to do next |
|---|---|
| An address doesn’t exist | Remove it. Check the rest of the list for typos or old contacts before continuing. |
| Repeated temporary deferrals or rate-limit errors | Reduce volume and read the error message. Follow any waiting period it gives you. |
| SPF, DKIM or DMARC failures | Fix the domain setup before increasing volume. |
| Recipients say the email was unwanted or landed in spam | Pause the campaign. Review permission, your list and the spam troubleshooting steps. |
| Several batches arrive without new delivery problems | Move to the next step of the plan. Check again after the next batch. |
Look for replies in Gmail too. They’re the best sign that people want your emails, though a quiet inbox doesn’t mean delivery failed. If tracking is on, Sync Email Status in the Campaign Reports menu marks rows BOUNCED or REPLIED in the status column.
You can also include a colleague’s Gmail or Outlook address in a batch and ask where it arrived. That’s one inbox, not proof of where everyone’s copy landed.
Use Postmaster Tools for your domain
Section titled “Use Postmaster Tools for your domain”If you manage your own domain, Google Postmaster Tools shows spam complaints, authentication and reputation for mail sent to personal Gmail accounts. You’ll need to verify the domain. Small senders may see no data because the volume is too low; don’t send extra emails just to fill the dashboard.
Google also recommends keeping the reported spam rate below 0.10% and never reaching 0.30%. Don’t use open rates to decide you’re ready to send more: Google says third-party open rates aren’t a reliable measure of delivery.
Pause the campaign if something goes wrong
Section titled “Pause the campaign if something goes wrong”Open the campaign, go to Save & Run, uncheck Enable this campaign, and click Save Campaign. To hold back one recipient, type SKIP in their Mail Merge Status cell. Don’t just clear a scheduled date, because an empty date means send now.
Before you resume, review the dates still in the sheet. A date that has passed is sent on the next run, unless it’s more than five days old. Move the remaining contacts to a new, gradual schedule, then enable the campaign again. The scheduling guide has the steps.
Skip the warm-up services
Section titled “Skip the warm-up services”Some services connect your mailbox to a network of inboxes that automatically send, open and reply to messages. Those replies come from machines, not your subscribers, so they don’t tell you whether your emails are wanted or where your next campaign will land. They also need access to your mailbox. Real emails to people who asked for them are the warm-up that counts.
Common questions
Section titled “Common questions”How long does email warm-up take?
Section titled “How long does email warm-up take?”Usually a few weeks if you’re building toward a larger daily volume, but there’s no fixed finish date. Once you can send the volume you need without new delivery problems, keep that pace rather than increasing just because another week has passed.
Does an older Gmail account need warming up?
Section titled “Does an older Gmail account need warming up?”Look at its recent sending history. An account you use regularly may already handle your usual volume. If it’s been quiet for months, or you’re moving from a few personal emails to a large mailing, start with smaller batches again.
What if I only have 30 subscribers?
Section titled “What if I only have 30 subscribers?”You don’t need to find extra people to email. For a new account, split those 30 subscribers into a few small batches and check delivery between them. After that, send when you have something useful to share.
Does warming up increase my sending quota?
Section titled “Does warming up increase my sending quota?”No. Sending limits and sender reputation are separate. A paid Mail Merge license doesn’t remove Google’s restrictions on a new Workspace account either.
What should I do if Google restricts sending?
Section titled “What should I do if Google restricts sending?”Pause the campaign and read the notice or returned email. Wait for the restriction to clear, fix the cause, and resume at a lower volume. Don’t leave a backlog of past-due emails ready to send all at once.
Is Gmail’s Promotions tab the same as spam?
Section titled “Is Gmail’s Promotions tab the same as spam?”No. Promotions is an inbox category for newsletters and offers, so a message there has reached the inbox. Look for bounces, complaints and actual spam placement instead.